Customizing look and feel
Sharing a custom look and feel across multiple Assembly Line interviews
The ALThemeTemplate repository is a template for a "brand" package that you can use for your own organization.
You can use this as the starting point for your own customizations, or decide which of the customizations below you want to implement for your organization.
Visual customization
You can customize docassemble, and Assembly Line interviews, with a Bootstrap 5 theme.
Customizing the logo and title for Assembly Line interviews
You should also customize the:
Creating a custom theme
If you want to build a custom theme, encompassing colors, fonts, button styles and other options that are configurable with css, you can create a custom Bootstrap theme.
To use a custom theme with docassemble, you:
- Create a .scss file with your customized variables.
- If you only want to customize colors, use Huemint.
- For more complex customization, including fonts and button shape, use bootstrap.build.
- Compile the theme using a tool like the ALDashboard.
Use Huemint to make a .scss file that customizes colors only
Visit Huemint. Create a color pallette that you like.
Scroll to the bottom of the page and copy the SCSS code that looks like this:
$white: #ffffff;

$theme-colors: (
    "light":      #cfd6d1,
    "dark":       #090807,
    "primary":    #760076,
    "secondary":  #f92e42,
    "info":       #9e8412,
    "success":    #00a167,
    "warning":    #d9cd00,
    "danger":     #e63300,
);
Or use Bootstrap.build to customize fonts, buttons, and more
To customize other elements of the theme, including fonts and button shapes, you need a more full-featured build tool. bootstrap.build can customize every Bootstrap option.
It is important that you only use Bootstrap.build to make a SCSS file. Do not download a bootstrap.css file from this site.
- Visit the bootstrap.build website.
- Click the button to open the Builder
- Customize the options that you want to customize. Typically those will include:
- Under color system, the $gray/$blue/etc. colors, if you use a matching color in your theme
- Under color system, almost always the variables
primary,secondary,success,info,warning,danger,lightanddark - Under Typography, customize any fonts that you wish to use
- Under forms, you may want to customize button size and rounded edges
- Click the "export theme" button (it may be hidden behind a banner at the top of the page) and choose the
"
_variables.scss" option.
Compile your theme using the ALDashboard tool
Inside the AssemblyLine's ALDashboard tool, visit the Compile Bootstrap Theme widget.
The link should be /start/ALDashboard/compile_bootstrap on your server. If you are associated with the Suffolk LIT Lab and have an account on the Suffolk Development server, you can visit a live version of the tool to try it out.
Click continue to acknowledge the minimum system version of your docassemble server.
Either copy and paste the snippet you copied from Huemint.com, or open the _variables.scss file you exported
from Bootstrap.build and copy and paste its contents. The _variables.scss file is a simple text file
that can be opened in any editor.
Add the @import "bootstrap"; line to the end of the Dashboard text entry field. This is required
for your theme to compile.
If you changed the $primary color (from the default blue), it usually also makes sense to directly set the
value of $blue to the same value you chose for $primary. (docassemble uses $blue for the section navigation,
and it usually looks better if it is the same color as the next/continue button).
Here is an example of working contents for a custom theme in the Dashboard window:
$white: #ffffff;
$blue: #760076;

$theme-colors: (
    "light":      #cfd6d1,
    "dark":       #090807,
    "primary":    #760076,
    "secondary":  #f92e42,
    "info":       #9e8412,
    "success":    #00a167,
    "warning":    #d9cd00,
    "danger":     #e63300,
);
@import "bootstrap";
The ALDashboard widget will let you see a preview of your theme so you can see what it will look like in docassemble.
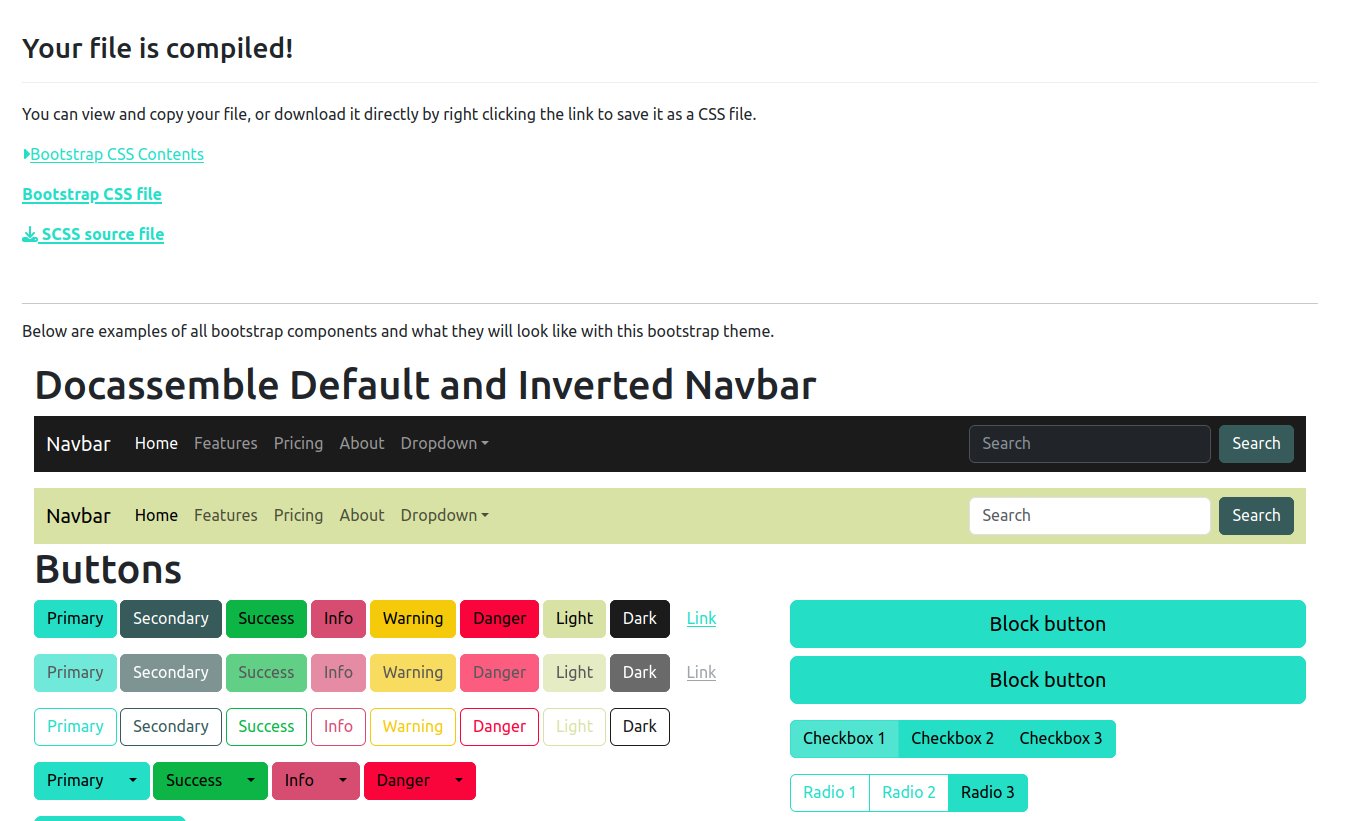
Once you like the colors you've chosen, download the compiled file, and then add it
a docassemble project, in the static folder. You can then reference your new file
by adding a bootstrap theme feature to your interview:
features:
  bootstrap theme: my_bootstrap_theme.css
Running node and npm to build a Bootstrap config (optional)
If you don't have access to a docassemble server yourself, you can also compile a bootstrap theme from source using node and npm.
Use a computer with a current version of Node. The instructions on this page assume you are using an Ubuntu Linux computer with Node installed, but they should be the same on any workstation. They were tested on a machine running Windows 11 with Ubuntu running under Windows Subsystem for Linux (WSL).
It also assumes that you have VS Code installed, but you can use any text editor of your choice.
First, download the Bootstrap source, and install its dependencies. As of this writing, the latest version you should use is 5.1.3.
wget https://github.com/twbs/bootstrap/releases/download/v5.1.3/bootstrap-5.1.3-dist.zip
unzip bootstrap-5.1.3-dist.zip
cd bootstrap-5.1.3
npm install
Place the custom.scss file you wrote from the above section
in the unzipped bootstrap-5.1.3 folder, and use npm to compile the theme file.
cd ~/bootstrap-5.1.3
npm run css-compile
Your new custom.css file is in the
~/bootstrap-5.1.3/dist/css directory. Copy this file to your docassemble
static folder and reference it as a bootstrap theme.
Overriding the favicon for a single interview
docassemble's global configuration only allows you to define the favicon server-wide, but sometimes you have a reason for a single interview to use a different one.
You can override the favicon at runtime by loading a custom JavaScript file in your interview:
$(document).on('daPageLoad', function(){
    var link = document.querySelector("link[rel*='shortcut icon'") || document.createElement('link');
    link.type = 'image/x-icon';
    link.rel = 'shortcut icon';
    link.href = "/packagestatic/docassemble.YourPackage/your_favicon.svg?v=2023_02_04_1";
    document.getElementsByTagName('head')[0].appendChild(link);
});
To use this:
- Install the package server-wide. The link will need to be pointed to a permanent location on the server, so you will not be able to test changes to the favicon from the playground.
- Create a JavaScript file (e.g.,
favicon.js) in your package'sdata/staticfolder with the code above. You can test the image is properly installed by visiting a url likehttps://apps.yourserver.com/packagestatic/docassemble.YourPackage/your_favicon.svg?v=2023_02_04_1after replacing the information with your actual package and image name. - Customize the SVG filename in the
link.hrefline, replacingYourPackagewith your package name andyour_favicon.svgwith your favicon filename.- It is a good practice to update the
v=...value after each change to the icon itself to avoid problems with the browser cache. The specific value is not important, but using a date in the parameter is a common practice called cache busting.
- It is a good practice to update the
- Add the JavaScript file to your interview's
featuresblock:
features:
  javascript:
    - favicon.js
The favicon will be updated whenever a new page loads in your interview, overriding the server's default favicon for that specific interview only.
Using dark mode
docassemble by default will show an alternate "dark mode" version of your interview to users who request it, usually with a browser or OS setting. You can set your browser or OS to use dark mode by following these instructions to see what your interview looks like.
Using custom fonts in the frontend
You can use custom webfonts with docassemble, just like you can with any other web product.
This Mozilla guide about web fonts is a good place to start.
If you do not already have a .woff or .woff2 file but you do have a TrueType (TTF) or OpenType (OTF) file that you are licensed to distribute, you can create one with a free online web font tool.
- Once you have a .woff file, upload it to the /static folder of a docassemble playground.
- Add an
@font-facedirective to your bootstrap.css file (or a separate CSS file that you reference in thefeaturesblock of your interview)
You cannot include Mako tags in your CSS file, so in order to use the new font face, you should add it to a docassemble package and then install the package on your server.
Example:
@font-face {
    font-family: 'my_font';
    src: url('/packagestatic/docassemble.MyTheme/my_font.woff2') format('woff2'),
         url('/packagestatic/docassemble.MyTheme/my_font.woff') format('woff');
    font-weight: normal;
    font-style: normal;
}
In the example above, MyTheme is a docassemble package that is installed server-wide. my_font is both the name of a web font and the name of the WOFF file.
Using custom fonts when creating PDF files from DOCX templates
If you would like to use a font other than the Microsoft fonts popular in the late 1990s-2000 era (Arial, Times New Roman, Courier) then you will need to install the fonts on your docassemble server.
Make sure that you have a license for each font you want to install.
The first step is to locate the .otf or .ttf file representing the font that you want to use inside your Word template (note that these are often in c:\windows\fonts)
Use the ALDashboard to install the font
The ALDashboard tool has a widget that helps you install a font server-wide so it is available when a DOCX is converted to PDF.
If you do not already have ALDashboard installed:
- Install the ALDashboard package via the global Package Management page (e.g., add
https://github.com/suffolklitlab/docassemble-ALDashboardto the GitHub input field and click "update") - Run it, either from the "Dashboard" menu item (if you added the menu shortcut) or by visiting /start/ALDashboard/menu on your server.
Once you are at the ALDashboard menu page:
- Click the Install Fonts button.
- Drag and drop the OTF or TTF file on the upload target and click "Continue". The font should be available after a short wait.
If the font isn't available, you can try stopping and then re-starting the container by logging in to the server
hosting your docassemble container and running docker stop -t 600 CONTAINERNAME followed by docker start CONTAINERNAME.
Manually install the font
- Copy the font to your docassemble server
- Copy the font inside the docker container
- reset the font cache
- restart the docassemble supervisor processes
scp ~/myfont.ttf apps.example.com:
ssh apps.example.com
docker cp myfont.ttf CONTAINERNAME:/usr/share/fonts
docker exec mycontainer /bin/bash
fc-cache -f -v
supervisorctl restart uwsgi
supervisorctl start reset
supervisorctl -s http://localhost:9001 restart unoconv
Replace "CONTAINERNAME" with the actual name of your container. You can often
auto-complete the container name by hitting tab.
Instead of copying the fonts to /usr/share/fonts, you could likely copy
them to /var/www/.fonts. This has the advantage of being writable by the
web process from a Python module.
If the font still does not appear to be installed (try generating a PDF with the
custom font),you may need to do a docker stop -t 600 CONTAINERNAME followed by a
docker start CONTAINERNAME.