Interview project management and working with teams
If you are building online guided interviews, whether for a court, legal aid organization, or the LIT Clinic, this page will guide you through the stages of a successful project. This page includes procedures, templates, and tools the LIT Lab uses in our own interview-building projects, which you can use as-is or adapt for your own team.
Overview
Interview-building project generally follows these phases:
| Phase | Primary goal |
|---|---|
| Kickoff | See sample agenda |
| Research | Gain insight into and understanding of the problem to be solved |
| Design | Agree on the project requirements/MVP |
| Development | Build the interview |
| Feedback | Feedback, revision, and further development |
| Launch | Publish the interview |
| Promotion | Make sure people who need the interview can find it |
| Retrospective | Identify areas of improvement for the next interview project |
After the kickoff through launch, the interview building team should hold regular standups and check-ins with the decisionmaker and key stakeholders.
If this is your first interview-building project, it may help to read more about planning and building your first expert system.
Kickoff
Hold a kickoff meeting for the project as early as possible. Everyone who is important to the success of the project—the interview building team, the decisionmaker, and the key stakeholders—should attend.
The goal of a kickoff meeting is to get everyone on the same page when it comes to roles, expectations, and timeline. A good kickoff meeting sets the stage for a successful project.
Sample kickoff meeting agenda
- Introductions
- Decide who will be the decisionmaker
- Review the interview-building process (i.e., refer to this page)
- Agree on a target launch date
- Schedule regular decisionmaker check-ins
- Decide on communication tools
- Ask the stakeholders to summarize the process (you can follow up later to get more details)
- Discuss the requirements for this interview and the minimum viable product (MVP)
- Agree on a process for changing the scope of the project (i.e., adding features)
- Discuss what success looks like for this project
- Consider doing a pre-mortem1
Research
Before you start building anything, gain a thorough understanding of the problem you are trying to solve.
Work with the decisionmaker and subject-matter experts to research the process and intended users. Consider developing user personas. Make sure the deciscion maker and key subject-matter experts agree with your understanding before you move on to design.
Document the process
An online guided interview is a single step in a larger and more complex process.
Start by researching that process from beginning to end—especially what happens before and after someone completes your interview. It always helps to interview someone with experience and observe while someone goes through the process, or both.
Process documentation checklist
- Identify the user's ultimate goal
- Review the relevant law and procedure
- List the documents the interview must assemble
- Create a flowchart of the process from beginning to end, including:
- What must have happened in order for someone to use this interview
- What the user will have to do after completing the interview
- List the pieces of information the user will have to provide to complete the interview, and classify each according to the Jarrett-Gaffney framework:
- Slot-in information the user already knows, like their own name and address
- Gathered information the user will look up from a readily available source like a court notice or a government ID (that you can tell them they will need before they start!)
- Third-party information the user will get by calling someone or looking it up in a database (make a list of the sources of this information)
- Created answers the user will make on the spot
User research and personas
Describe the intended user of the interview.
- Legal knowledge
- Assistance
- Education level
- Languages they can speak
- Languages they can read and write
- Reading comprehension level
- Time available
- Access to technology (computer, smartphone, printer, etc.)
- Reliable internet access
- Stress or trauma involved in this process
Consider creating 2 or 3 user personas that together describe likely interview users. Considering design and development problems from the perspective of your user personas can give you insight into what actual users will need from it.
If your user personas are too general, they won't be help you focus. If they are too specific, they can result in blind spots and missed opportunities.
Even if your personas are about the right specificity, watch out for blind spots—details that could lead to a poor experience for other likely users. In the sample persona below, for example, "Maria" is a single mother. That's a helpful detail for understanding what someone facing eviction might be experiencing, but you probably wouldn't want to build an eviction defense tool that assumes all users are single mothers.
To strike the right balance, each user persona should reflect about 20–30% of likely users. Then, if you create 2 or 3 user personas, they should cover the majority of likely users. Even so, when you always check for blind spots when referring to a persona=!
Sample persona for an eviction defense tool
Maria Tenant
| Details | |
|---|---|
| Age | 35 |
| Location | Boston, MA |
| Occupation | Retail worker |
| Family status | Single mother with 2 children, ages 8 and 5 |
| Income | Low |
| Housing status | She is renting a 2-bedroom apartment in a building occupied primarily by other low-income families |
| Technology use | She owns an older Android smartphone with a limited data plan; uses social media and does all her communication on her phone |
| Challenges | |
|---|---|
| Financial strain | She earns $20,000 per year, which isn't enough for her expenses. She often has to decide between paying different bills. |
| Limited legal knowledge | She has limited understanding of her rights as a tenant and feels intimidated by legal processes. |
| Limited resources | She has limited access to technology and legal assistance due to her financial situation and work hours. |
| Goals | |
|---|---|
| Stability | Her primary goal is to provide a stable home for her children. She wants to avoid eviction to maintain access to her children’s school and her local support network. |
| Education | She is keen to learn more about her rights as a tenant and how she can legally contest an unfair eviction. |
| Assistance | Maria needs easy-to-understand, accessible legal advice and support that fits into her limited budget and time constraints. |
Design
Before you start building anything, make sure everyone agrees on what you will be building. The decisionmaker should sign off on the requirements as well as any flowcharts or wireframes.
Identify the project requirements/MVP
Start by listing the requirements for your project—what it must do to be acceptable. Remember that you are building the first version of this interview, and you can iterate and improve on it in the future. Start by building something that works, using the minimum viable product concept as a guide.
Minimum viable product (MVP)
First make something that works, then make it better. Consider Henrik Kniberg's skateboard analogy:
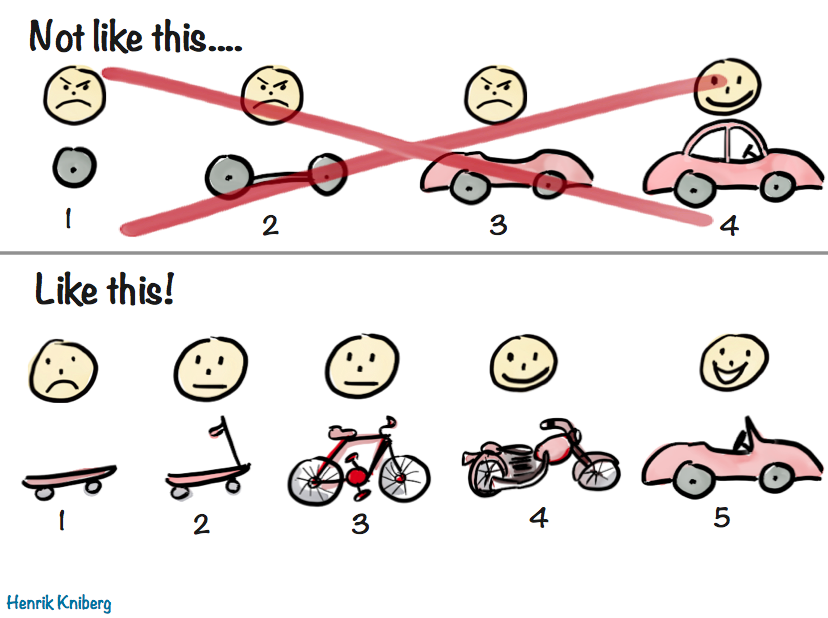
Different projects will have different MVPs/skateboards.
The LIT Lab's legal form maturity model is a framework for thinking about online guided interview MVPs. For interviews built for legal professionals, level 1.5 is usually enough. Interviews built for the general public should usually target level 2+. Levels 3 and 4 are mostly meant for future iterations.
An MVP can be as simple as a list of requirements.
Sample MVP requirements for a court form
Maturity model target level: 2
- The user can correctly complete every field/blank on the form
- The interview flows like a natural-language intake with a new legal aid employee
- The form identifies users who cannot use the firm as early as possible, and gives them an "off-ramp"
- The interview uses branching logic to skip unnecessary questions and provide a logical flow
- Compound questions are broken up into separate screens
- The user is not asked for the same information twice
- The interview correctly populates every field on the form
- The user can sign on their computer or phone screen
- Questions are written in plain language (for a 6th-grade reading level)
- The user will be offered a next-steps document to download
- The interview has been approved by key subject-matter experts
- The interview has been tested rigorously with a combination of scenario-baesd user testing, random input testing, or automated testing
Once the decisionmaker agrees on the requirements, stick to them. Don't add requirements without a compelling justification.
Use flowcharts or wireframes
Flowcharts and wireframes allow you to "sketch" the interview you plan to build. They may not be necessary for very simple interviews, but they are worthwhile if your interview has conditional elements or unique questions.
A flowchart illustrates the branching logic of an interview and can help identify hidden complexities early on. For example, a flowchart would be helpful to illustrate:
- Whether the user qualifies to use the interview/court form
- Which form or sections of the form the user must complete
- Whether to ask particular follow-up questions
- Which values should be provided to which variables in which circumstances
- Whether additional information or documents should be included in the output
- Which court the user should file in
- Which filing codes to use
A low-fidelity wireframe is a simplified prototype of a user interface element that emphasizes function over form. Wireframes are helpful if you need to design a new type of form element (i.e., one that does not already exist in the question library).
Pen and paper works fine for flowcharts and wireframes, but there are plenty of software tools available. Consider using one that lets you save your flowchart or wireframe in a format you can save along with the interview.
Development
Once the decisionmaker has signed off on the requirements/MVP and any flowcharts or wireframes, it's time to start building the interview!
The LIT Lab's interview project template can help you keep your team organized and your project on track. It is based on the Scrum agile project management framework.
To use the project template:
- Go to the interview project template and make a copy for yourself by clicking the Use this template button (you'll need a free GitHub account)
- Once you have published your interview to GitHub, connect the project board to your interview repository
- New issues will be added to the backlog automatically
- Issues will be closed automatically when the card is moved to the Done column
- As you work on your interview, follow the GitHub workflow and move issues/cards from left to right
You can also find a beginner's guide, interview-builder resources, and extensive documentation elsewhere on this website.
Feedback
The interview is ready for feedback when it works, and you have closed all the MVP issues. (You can also find a checklist in the interview project template.)
Internal feedback
Before you show the interview to the decisionmaker and stakeholders, get someone with Document Assembly Line experience to test it with you. This will help you identify issues you may have missed and questions you still need to ask the decisionmaker.
If you aren't sure where to find someone to give you preliminary feedback, try asking the community! Come to one of the Monday community meetings or ask in the Microsoft Teams forum.
Schedule a video meeting with the tester. You can demonstrate it for them, or you can watch them go through the interview. Record the test if you can so you can focus on the feedback and asking follow-up questions instead of taking notes.
During the demo:
- Remind the tester that they are testing the interview; they are not being tested (and neither are you!)
- Encourage the tester to comment on all aspects of the interview
- Ask them to follow different branches of the interview logic
- Listen carefully to their feedback and ask follow-up questions to make sure you understand it
External feedback
Once you have closed all the issues that are in scope for the MVP and tested the interview yourself, it should be ready to hand off to the decisionmaker and stakeholders for their testing and feedback.
Share the interview with the decisionmaker and give them a few tips for giving helpful feedback:
- The feedback should come in the form of a written list of requested changes
- If there is confusing or conflicting feedback from stakeholders it is the decisionmaker's responsiblity to clarify it before presenting it to the interview building team
- Change requests should be specific. For example, if the text of a question should be changed, the change request should include the new text.
- At the top of each page of the interview is an ID. Use the ID to refer to specific interview pages, not a page number.
Two rounds of external feedback and revision are usually enough to get you to the point where you just have a punch list of final tasks to do before the interview is ready for launch.
Launch
When the interview is complete, there is one last decision for the decisionmaker to make: whether the interview is ready to go live.
If the answer is yes, launch the interview! (You can find a launch checklist on our interview project template.)
If the answer is no, find out if further revision would result in a yes. If not, do a retrospective and try to understand what happened.
When you are ready to launch, add the interview to your production server and make sure it works as intended. Now is also a good time to check and update the GitHub repository details and add some protections.
Promotion
Once the interview is live, consider how people who need it will find it.
- You should have a dedicated page on your website that tells people about the interview and links to it. Optimize the page for search engines, too!
- Others might want to direct people to the interview, like courts, legal aid organizations, and other advocates. Ask them to link to your landing page from their own websites.
- Paid advertising can help spread awareness, if you have a budget for it.
Retrospective
Before you start another interview-building project, pause briefly for a retrospective on how this one went. The retrospective format comes from Agile software development, and it is a way to embrace continuous improvement by taking a moment to reflect on the project you just finished in order to improve the next one.
If your interview project fails, a retrospective is an important tool for making sure you avoid another failure.
To do a retrospective, the project manager should meet with each member of the group to discuss and document the answers to three questions:
- What went well that we should keep doing?
- What did not go well that we should stop doing?
- What should we try going forward?
Retrospectives are generally most effective one-on-one, in real time.
Insist that everyone give at least one answer to each question. Even if someone insists nothing went badly, ask if they found themselves confused or struggling at any point during the project. Their answer may lead to an area that could be improved.
Use what you learn from the retrospective when planning your next interview-biulding project.
Success metrics
Consider measuring the success of your project in terms of:
- Time saved by those who use the tool
- People helped as a percentage of total filings of the same type
- Closing an access gap by enabling people to do something they couldn't before
You can use the InterviewStats package to track usage. Usability tests, reading grade level measurements, and auditing for best practices can help you understand how your interview has affected the access gap.
Transfer documentation
Before you set the project aside, take some time to help the next developer—which might be you!
One of the best places to store information and documents for the next developer is in the GitHub repository.
- Create an issue for anything left unfinished, feedback you couldn't implement, ideas for future improvement, etc.
- Add any other helpful notes or details to the README file
- You can also add a transfer folder to hold research, flowcharts, wireframes, feedback, and other documentation
Roles and responsibilities
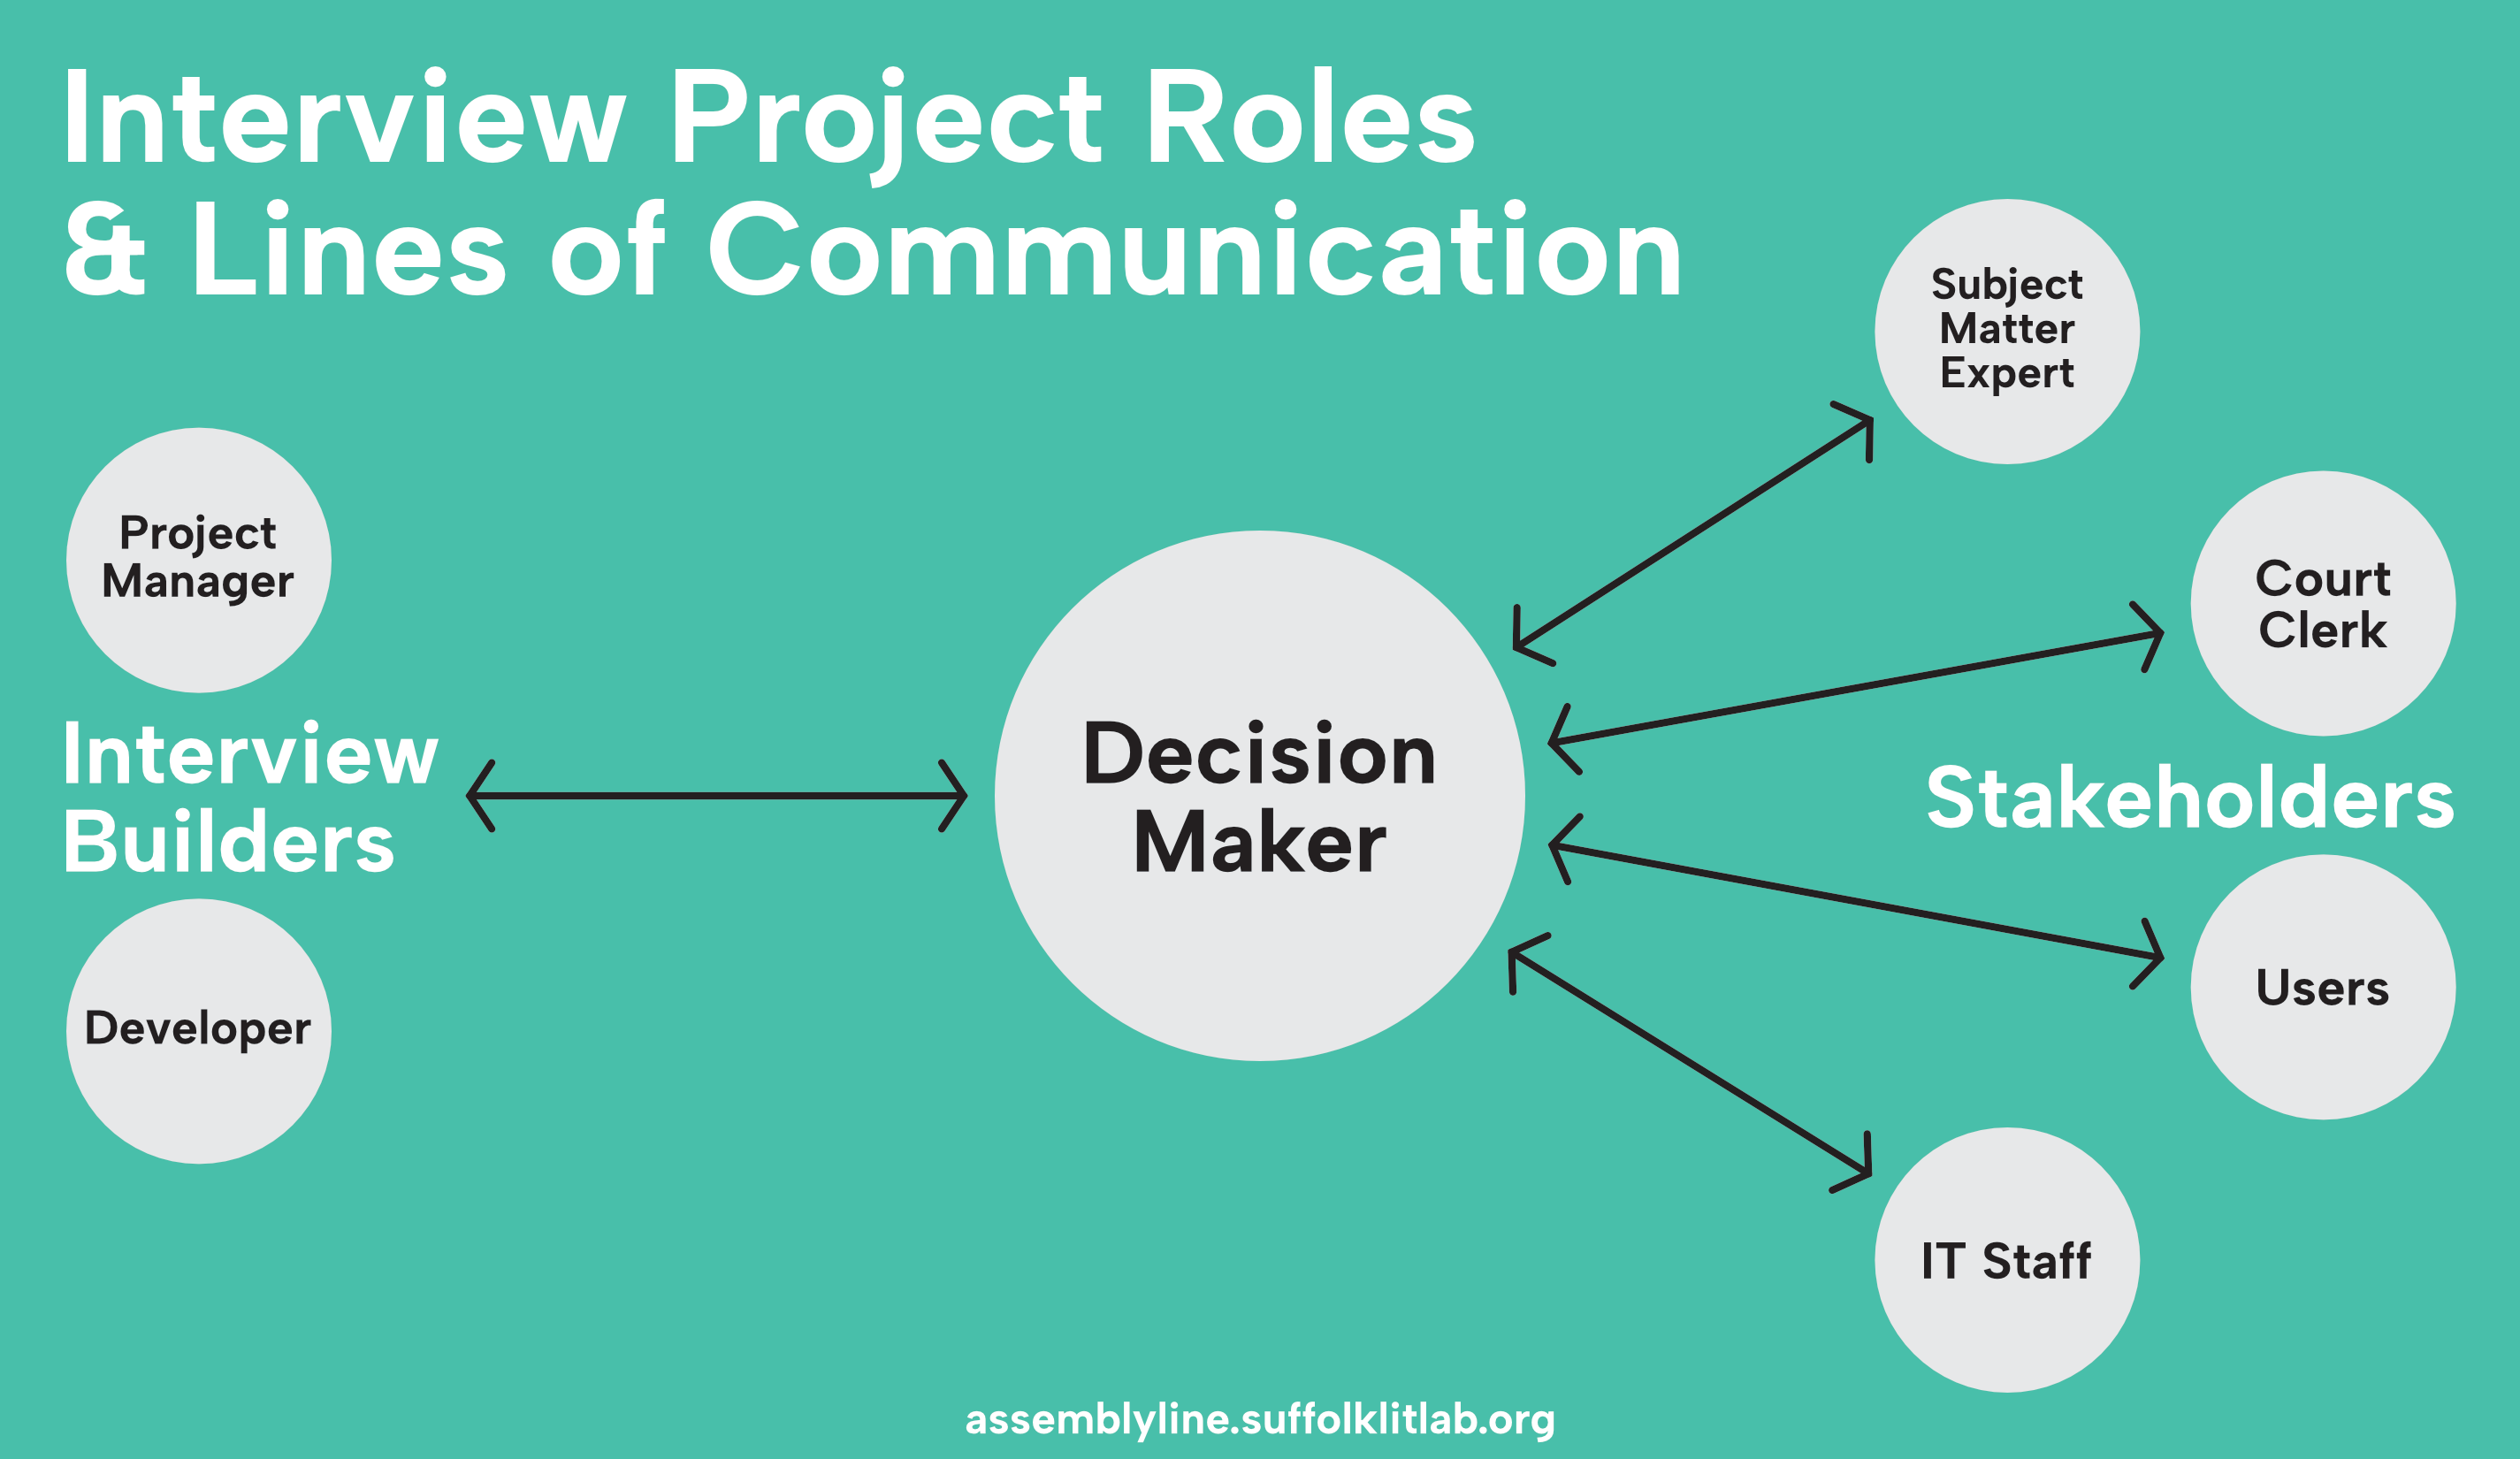
Every interview project has several roles:
- Interview builders. The person or team responsible for building the actual interview. Sub-roles include designer, lead developer, developer, and project manager.
- Decisionmaker. One person who represents the client and is responsible for managing stakeholders and converting their feedback into clear decisions for the interview builders. Similar to a product owner.
- Stakeholders. Anyone who needs to have a say in the interview project, such as managers, judges, clerks, subject matter experts, IT staff, and users (self-represented litigants and lawyers).
You may have a team of interview builders and dozens of stakeholders, or you may be the only person working on this project. Even if this is a solo project, it helps to keep your different roles in mind.
The decisionmaker
While a successful interview project needs all these roles, the decisionmaker is especially important. Most interview projects involve multiple stakeholders. When the interview building team requests guidance or feedback, multiple stakeholders may give multiple responses that may be confusing or conflicting and dramatically slow progress.
The decisionmaker's job is to gather and clarify stakeholders' feedback so that interview builders have clear decisions to work from. The decisionmaker's responsibilities also include:
- Being a single point of contact and single source of decisions
- Regular meetings with the interview building team
- Timely responses to requests for decisions and feedback
- Gathering feedback or approvals from stakeholders and converting it to clear decisions
- Making the go/no-go decision to launch the interview
The decisionmaker must either (1) have the authority necessary to carry out these responsiblities, or (2) be responsible for getting authority when necessary.
Timeline
When creating your project timeline, keep in mind the experience and availability of your team—especially the interview builders.
- An experienced, full-time developer has about 25 productive hours in a week
- A beginner may take 3–5 times as long to do the same work
- Other projects and obligations will reduce availability
For a single, fairly simple form, it might take about 20 hours for research, design, and development. But if a beginner is doing the work, assume it will take them 60 hours. And if they only have 3 hours per week, it will take about 5 months (20 weeks).
Modify the sample and estimation guides below based on your team's experience and availability.
Sample timeline
This is a sample timeline with estimated minimum times to complete each project phase. Your team may decide it needs or wants more time for any of these phases due to experience, availability, or other reasons.
| Phase | Estimated minimum time |
|---|---|
| Kickoff | 1–2 hours |
| Research | 1–2 weeks |
| Design | 1 week |
| Development | See estimating development time |
| Feedback | 6 weeks (see estimating feedback time) |
| Launch | 1 day |
| Promotion | 1 week, then ongoing |
| Retrospective | 20 minutes per team member |
Estimating development time
Development is a function of the complexity of the interview and the development resources (developer time) available.
When estimating development time, take into consideration:
- The number of templates
- The number of fields
- The number of branching points in the interview logic
- How dynamic the interview questions need to be (i.e., to account for quantity, pronouns, and relationships, etc.)
- How dynamic the output documents need to be
Estimating feedback time�
Most interview projects will involve 1 round of internal feedback and revision and 2 rounds of external feedback and revision, then a final punch list to finalize the interview for the go/no-go decision.
A round of feedback includes:
- Demonstrating or handing off the draft interview
- Feedback, which may be:
- Given synchronously (i.e., as part of a demo)
- Given asynchronoustly (i.e., the decisionmaker coordinates testing among stakeholders, compiles and clarifies their feedback, and delivers it to the interview-building team)
- Revision or further development based on the feedback
Internal feedback can be informal. For example, in the LIT Clinic, students demonstrate their interview in class, followed by 10–15 minutes of real-time feedback.
When seeking external feedback, stakeholders will need time to test and review the interview, and the decisionmaker will need time to consolidate and clarify the stakeholders' feedback. This will generally take at least a week.
Each round of feedback should include time for revision or further development based on the feedback received.
Assume at least 1 week for internal feedback (demo with live feedback, then revision). Assume at least 5 weeks for external feedback (2 rounds of feedback and revision, plus a final punch list).
Meetings
Every interview building project should start with a kickoff meeting and then follow a regular cadence of interview-builder standups and decisionmaker-stakeholder check-ins.
Development standups
The interview-building team should meet frequently for a short, 5–15 minute "standup" to share progress and identify and remove blockers. It's also possible to do standups asynchronously, but only if your team works well that way.
Daily check-ins are common on active projects, and anything less than weekly is unlikely to be effective.
Standups should follow a straightforward standing agenda. Each person on the team shares:
- Progress: what they worked on or accomplished since the last meeting
- Plan: what they are working on now
- Blockers: anything preventing them from making progress
The reason for sharing your progress and plan for the day or week is so that everyone is aware of what everyone else on the team is working on. This is necessary for the project manager, and can help interview builders avoid merge conflicts or identify when it's time to merge branches.
The reason for sharing blockers is to get help. Some teams reserve a larger block of time and use it to solve blockers together, like we do in our Monday community meetings. Other teams prefer to solve blockers separately. And sometimes a blocker is a question you need answered by the decisionmaker before you can move forward.
Consider incorporating our Monday community meetings into your standup schedule. We run them standup-style, plus time for solving blockers as a group. If this is a solo project, the Document Assembly Line community can be part of your interview-building team!
Decisionmaker check-ins
Weekly or every-other week check-in with the decisionmaker and one or two key stakeholders are a chance to keep them informed of your progress and get decisions when you need them to move forward. The standing agenda is similar to the one above:
- Progress: what the interview-building team worked on or accomplished since the last meeting
- Plan: what the interview-building team plans to work on between now and the next meeting
- Questions: oustanding questions that are preventing the interview-building team from making progress
When sharing progress and the current plan, it can help to give a percentage estimate. Something like: "We think we are about 30% of the way to a complete draft interview, and by our next meeting we hope to be at 50%."
Use GitHub issues to keep track of your questions for the decisionmaker. If you add a question label to issues, it is easy to pull up the list of your questions during a meeting.
Tips for asking questions
To get better answers, ask questions better:
- Don't ask a question if you don't need the answer. Before you ask the decisionmaker, ask your interview-building team or consult your style guide or other internal documentation.
- Avoid open-ended questions. Intead, give the decisionmaker options and explain the pros, cons, and implications of each.
- If you must ask an open-ended question, explain that you are trying to generate ideas, not come up with the solution right then and there.
- Don't ask the decisionmaker to design the interview. It is usually better to clarify goals or requirements ("Do you need the attorney's ID number?"), not details ("Do you want the ID number field to show up right under the attorney's name field?").
Remember: if you ask a question you will get an answer. If you don't need an answer, asking for one is not likely to help, and you may get an answer that complicates the project instead of helping you move forward.
Finally, when showing the relevant part of the interview to illustrate a question, remind the decisionmaker and stakeholders that the interview is a work in progress and you are not ready for feedback beyond the answer to your question.
Communication
You will need to communicate outside of meetings, of course. Agree on the tools you will use internally (i.e., within the interview-building team) and externally (i.e., with the decisionmaker and stakeholders).
For LIT Lab projects, we use:
- Zoom for meetings
- GitHub issues for internal communications
- Microsoft Teams for general internal communications and file storage
- Email for external communications
Tips from the community
In a Document Assembly Line workshop, members of the community shared their tips for managing a successful interview-building project:
Footnotes
-
A pre-mortem can be helpful on larger and riskier projects. A pre-mortem asks participants to imagine a project's failure in advance, without judgment or blame. Studies show that premortems can increase the success of projects because they make it easier for stakeholders to "correctly identify the reasons for future outcomes" by as much as 30%, reduce the risks, or reconsider the project. ↩