Installing the Document Assembly Line
Before you get started, make sure that you have installed Docassemble on a server that you maintain.
Installing the Assembly Line covers the following basic steps:
- Install the docassemble.ALDashboard package
- Run the installation script
- Customize and install the ALThemeTemplate package with branding and question wording to match your needs.
- Use the Weaver tool to automate your labeled PDF or DOCX forms.
Install ALDashboard
ALDashboard contains several features, but most importantly, it includes a menu-driven installation script for the Assembly Line.
It will help you:
- install all required and optional Assembly Line packages
- verify and configure short links, configuration changes, and API configurations
To install ALDashboard:
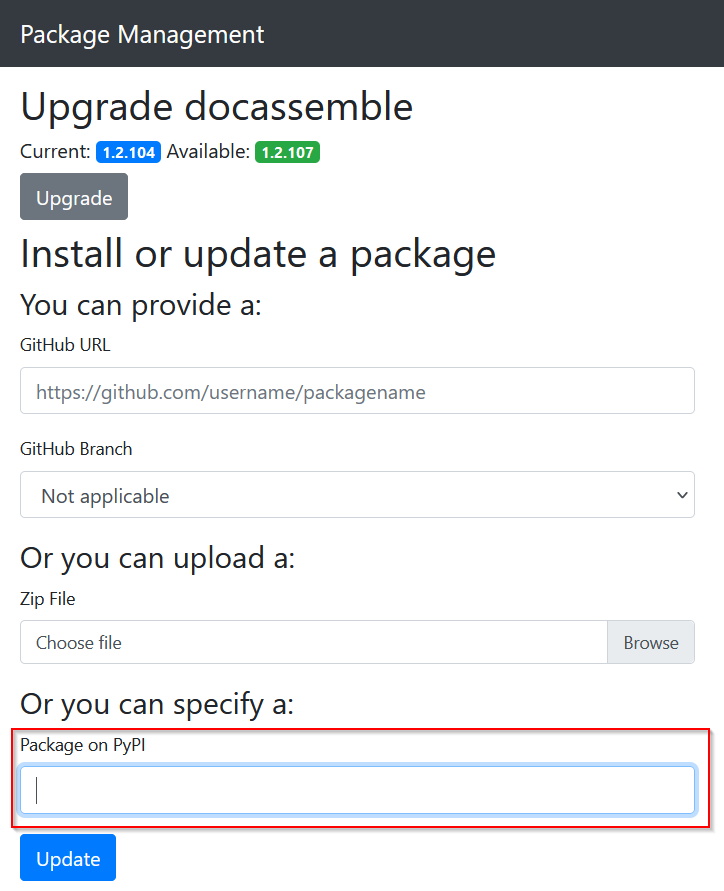
- visit the "Package Management" menu on your Docassemble server when you are logged in as a server administrator
- Type
docassemble.ALDashboardinto the input box labeledPackage on PyPI
- Click the Update button.
Run the installation script
Once ALDashboard is successfully installed, edit this link to replace
YOUR_SERVER with the URL to your own Docassemble server and visit it.
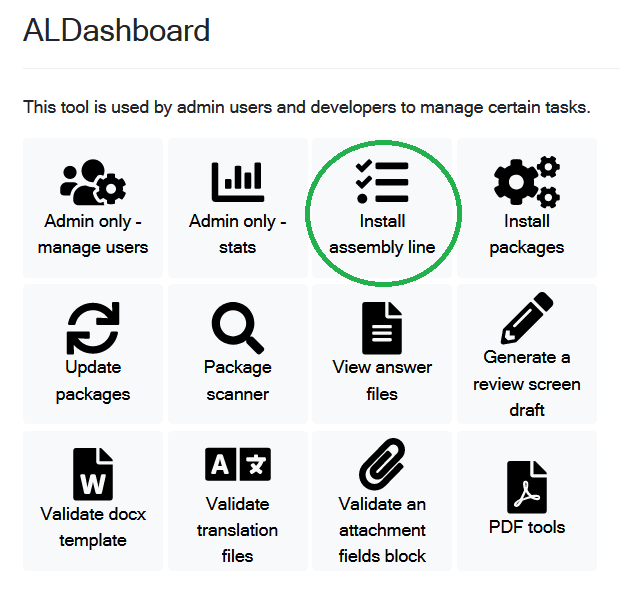
https://YOURSERVER.com/start/ALDashboard/menu
Click the icon labeled "Install Assembly Line"

You will be asked to set up multiple APIs during the installation process. If you do not have accounts yet, you can use the default choices for those requests and return to them later.
Specifically, you will be asked to setup:
- Google Maps, Places, and Google Geocoding APIs
- VoiceRSS
- Twilio SMS
- an email server of your choice (we recommend Sendgrid)
You will also be asked to create a GitHub private access token on a new GitHub account. This account should NOT be your primary account as it will be used for automation.
Walk through the guided menus to complete the installation. You can safely install all recommended packages and use all default configuration choices. If you do not know the answer, you can return and manually edit your configuration later.
Customize the ALThemeTemplate repository
ALThemeTemplate is a docassemble package that includes an example of how to modify questions and customize them for your own jurisdiction or organization.
To use this package, pull it into your own Docassemble playground.
Next, follow our guide to edit the YAML files and add a custom CSS theme to fit your own organization's needs.
Now, create a new package from the Playground packages menu. Give the package a meaningful name, like LouisianaSharedBranding. Select the files that you customized and push them to your own Github repository.
It is important to copy and create a new package. Do not fork the ALThemeTemplate package as Docassemble makes it challenging to rename a package.
Using your ALThemeTemplate with the ALWeaver
If you plan on using the ALWeaver to create your interviews, you will want to include your branding package in your weaved interviews. You can do this by adding 2 files to your branding package:
-
In your modules folder, create a file named
advertise_weaver.pyand add the following contents:# pre-load
import os
from docassemble.ALWeaver.custom_values import advertise_capabilities
if not os.environ.get('ISUNITTEST'):
advertise_capabilities(__name__, minimum_version="1.5") -
In your sources folder, create a file named
configuration_capabilities.yml(needs to have that exact spelling), and add the following contents:package name: My Package
organization_choices:
- description: MyPackage
dependency: "docassemble.MyPackage @ https://github.com/MyOrg/docassemble-MyPackage/archive/main.zip"
include_name: "docassemble.MyPackage:custom_organization.yml"
state: TX
country: US
default: falseYou should replace
MyOrgandMyPackagewith the name of your GitHub organization and the name you gave your custom branding package. If you changed the name ofcustom_organization.yml, the default name of the yaml inALThemeTemplate, in your package, you should also changecustom_organization.ymlabove.
Docker-level server configuration changes we recommend
Increase nginx timeouts to 5 minutes
Sometimes, long-running Docassemble processes can "timeout." The default experience in Docassemble is to show the server's built-in error page, which can be confusing for your end user.
We recommend that you increase the nginx timeout for uwsgi from 60 seconds (default) to 5 minutes to reduce the frequency that users run into this ugly error screen.
Unfortunately, this error page can only be changed by sshing into the server and then entering the docker container.
- SSH to the server running Docker.
- Type
docker exec -ti $(docker ps --filter "ancestor=jhpyle/docassemble" --format {{.ID}}) /bin/bash
Install a text editor and open the nginx configuration file as follows:
apt update
apt install nano
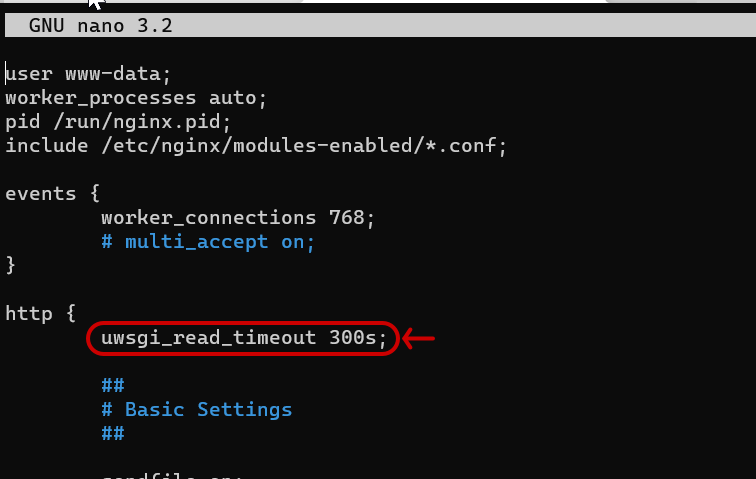
nano /etc/nginx/nginx.conf
Add the following exact text to the http section: uwsgi_read_timeout 300s;

Type CTRL+O, Enter, and then CTRL+X to save and exit the configuration file.
Type the following commands to restart the nginx process:
supervisorctl restart nginx
Replace the nginx 504 gateway timeout page
The default nginx timeout screen is a little menacing. It also does not give
you an indication that you can refresh the screen to try again, but often that
lets you get past the timeout. But you can customize it.
Here is a custom HTML 504 gateway timeout
page
that you could install with your own branding and that you can use to replace
the nginx default. It adds a "Reload" button that may allow your user to move
past the error string.
First:
- SSH to the server running Docker.
- Type
docker exec -ti $(docker ps --filter "ancestor=jhpyle/docassemble" --format {{.ID}}) /bin/bash
Install a text editor:
apt update
apt install nano
Create a directory to store your custom configuration files:
mkdir /usr/share/nginx/html/errors
Open a new nano editor:
nano /usr/share/nginx/html/errors/custom_504.html
Copy and paste the contents custom HTML 504 gateway timeout
page
into the open nano editor on your server.
Type CTRL+O, Enter, and then CTRL+X to save and close the editor.
Edit the nginx configuration file to point to your new custom error page:
nano /etc/nginx/nginx.conf
Add this line of code to the configuration file, inside the main http {}
brackets: error_page 504 /errors/custom_504.html;
Type CTRL+O, Enter, and then CTRL+X to save and close the editor.
Restart the nginx process:
supervisorctl restart nginx
Monitor your server
There is always the chance that something goes wrong with your server when you aren't looking and that it goes down.
We suggest using a service that can attempt to access your server periodically and notifies you if it goes down. Some options include:
- UptimeRobot
- Using GitHub action's scheduled actions to attempt to access your server. The SuffolkLITLab has an example of this type of GitHub action, that you could copy and modify (we'd be happy to help your modify it for your needs).